2013
06.30

I ran into an error compiling the Nagios NRPE plugins on my Arch linux raspberry pi as follows:

In file included from localcharset.c:28:0:
./stdio.h:456:1: error: ‘gets’ undeclared here (not in a function)
make[4]: *** [localcharset.o] Error 1
make[4]: Leaving directory `/root/nagios-plugins-1.4.16/gl'
make[3]: *** [all-recursive] Error 1
make[3]: Leaving directory `/root/nagios-plugins-1.4.16/gl'
make[2]: *** [all] Error 2
make[2]: Leaving directory `/root/nagios-plugins-1.4.16/gl'
make[1]: *** [all-recursive] Error 1
make[1]: Leaving directory `/root/nagios-plugins-1.4.16'
make: *** [all] Error 2

A quick Google search brought me to the following page with details of the patch to fix the error:
http://bugzilla.redhat.com/show_bug.cgi?id=835621#c6

Edit the nagios-plugins-1.4.16/gl/stdio.in.h file and search for the following lines:
#undef gets
_GL_WARN_ON_USE (gets, "gets is a security hole - use fgets instead");

Add the following if statement as follows:
#if defined gets
#undef gets
_GL_WARN_ON_USE (gets, "gets is a security hole - use fgets instead");
#endif

Your plugins should now compile successfully and you can continue your install as normal. Steps for a normal install are detailed below:
1 pacman -S base-devel
2 tar -xvf nagios-plugins-1.4.16.tar.gz
3 cd nagios-plugins-1.4.16
4 ./configure
5 make
6 make install
7 chown nagios.nagios /usr/local/nagios
8 chown -R nagios.nagios /usr/local/nagios/libexec
9 tar -xvf nrpe-2.14.tar.gz
10 cd nrpe-2.14
11 ./configure
12 make all
13 make install-plugin
14 make install-daemon
15 make install-daemon-config
16 make install-xinetd
17 nano /etc/xinetd.d/nrpe
Add Server IP Address
18 nano /etc/services
Add nrpe 5666/tcp
19 pacman -S xinetd
20 systemctl start xinetd
21 netstat | grep 5666
22 /usr/local/nagios/libexec/check_nrpe -H localhost
23 systemctl enable xinetd
24 nano /usr/local/nagios/etc/nrpe.cfg
25 systemctl restart xinetd

2013
06.30

1 useradd -m -s /bin/bash nagios
2 passwd nagios
3 groupadd nagcmd
4 usermod -a -G nagcmd nagios
5 usermod -a -G nagcmd www-data
6 wget http://prdownloads.sourceforge.net/sourceforge/nagios/nagios-3.5.0.tar.gz
7 wget http://prdownloads.sourceforge.net/sourceforge/nagiosplug/nagios-plugins-1.4.16.tar.gz
8 tar -xvzf nagios-3.5.0.tar.gz
9 cd nagios/
10 ./configure --with-command-group=nagcmd
11 make all
12 make install
13 make install-init
14 make install-config
15 make install-commandmode
16 nano /usr/local/nagios/etc/objects/contacts.cfg
17 make install-webconf
18 htpasswd -c /usr/local/nagios/etc/htpasswd.users nagiosadmin
19 /etc/init.d/apache2 reload
20 cd ..
21 tar -xvzf nagios-plugins-1.4.16.tar.gz
22 cd nagios-plugins-1.4.16/
23 apt-get install libssl-dev
24 ./configure --with-nagios-user=nagios --with-nagios-group=nagios
25 make
26 make install
27 ln -s /etc/init.d/nagios /etc/rcS.d/S99nagios
28 /usr/local/nagios/bin/nagios -v /usr/local/nagios/etc/nagios.cfg
29 /etc/init.d/nagios start

Verify Nagios config before re/starting Nagios services:
/usr/local/nagios/bin/nagios -v /usr/local/nagios/etc/nagios.cfg

There is essentially a 4-step process for adding new nagios nrpe plugins, 2 steps will need to be carried on the client and then a further 2 steps will need to be carried out on the server as follows:
*Directory structure below assumes you’ve compiled from source without changing the default install path.

1.   On the client, copy the new nagios nrpe plugin to the following directory:
/usr/local/nagios/libexec/
2. On the client, add the command check for the new plugin here:
/usr/local/nagios/etc/nrpe.cfg
3. On the server, define the new command check here:
/usr/local/nagios/etc/objects/commands.cfg
4. On the server, add the new command you’d like to be checked on the client here:
/usr/local/nagios/etc/objects/linux-servers.cfg

Finally, as always you must remember to restart the nagios/nrpe services on both the server and the client when ever any changes are made to your config files.

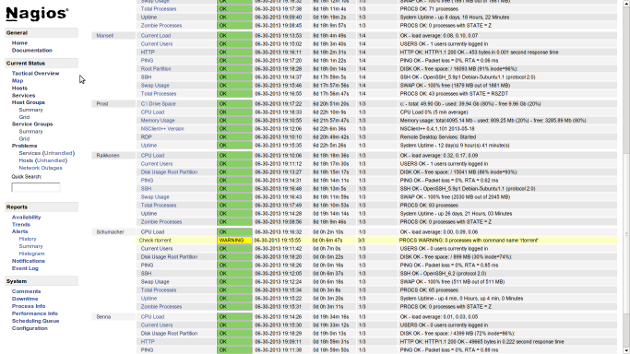
Screenshot of Homecomputerlab servers monitored by nagios :)

2013
06.11

Wireshark

We had an interesting issue this week with video conferencing where ~20min into a VC call we would lose audio into one of our offices. Audio from this office would still be sent to all other offices and could be heard by everyone else in other offices on the call, but we just couldn’t hear them. Then 5-10min later incoming video would then freeze on our screen however to all other offices dialled into the call our video feed would still continue to be received smoothly. After a few calls with different service providers and confirming firewall config was correct and then removing our firewall config completely for testing purposes, we were still experiencing the issues and were no closer to an answer, it was finally time to break out wireshark for some packet capturing/debugging, if anything to prove that everything was working properly as expected on the network layer.

Below is the config needed to setup port mirroring on the switch stack:
monitor session 1 source interface Gigabitethernet 1/0/10
monitor session 1 destination interface GigabitEthernet 1/0/35
show monitor session 1

And how to install wireshark and run as a regular user on ubuntu:
sudo apt-get install wireshark
sudo groupadd wireshark
sudo usermod -a -G wireshark <USER>
sudo chgrp wireshark /usr/bin/dumpcap
sudo chmod 750 /usr/bin/dumpcap
sudo setcap cap_net_raw,cap_net_admin=eip /usr/bin/dumpcap
sudo getcap /usr/bin/dumpcap
sudo chmod +x /usr/bin/dumpcap

Log out and back into unity and you should be good to start packet capturing.

2013
06.09


Install NginX and start the service:
pacman -S install nginx
systemctl start nginx

Test default html homepage is loading:
http://192.168.123.123You should be greeted by the default html ‘Welcome to nginx’ page

Now to get php working:
There are a few ways you can get php to serve via nginx and plenty of blogs that discuss the different options available including pros and cons of each method. The method I’ve chosen is to proxy requests to php-fpm via the FCGI protocol using unix sockets.

First I’m going to neaten up my nginx.conf file and separate my virtual hosts file similar to Debian simply because I like my config files that way. To do so we’ll move everything after the server{ directive into a debian style virtual hosts file and add the following line at the end of your nginx.conf file:

nano /etc/nginx/nginx.conf

include /etc/nginx/sites-enabled/*;

mkdir sites-enabled
nano /etc/nginx/sites-enabled/default

Paste everything after the server{ directive into your virtual hosts file. The virtual hosts file will still be a bit of a mess, but we’ll tidy this up later, for now I just wanted to separate the config.

Next install php components:
pacman -S php php-fpm

Ensure that php is listening in the right place:
nano /etc/php/php-fpm.conf

;listen = 127.0.0.1:9000
listen = /run/php-fpm/php-fpm.sock

Now I’m going to tidy up my virtual hosts file to serve php and remove any extraneous config at the same time:
nano /etc/nginx/sites-enabled/default

server {
listen 80;
server_name www.homecomputerlab.com;
root /var/www;
index index.html index.htm index.php;

location ~ \.php$ {
fastcgi_split_path_info ^(.+\.php)(/.+)$;
fastcgi_pass unix:/run/php-fpm/php-fpm.sock;
fastcgi_index index.php;
include fastcgi.conf;
}

}

Next we need to ensure that php is allowed to execute from our web root directory:
nano /etc/php/php.ini

open_basedir = /srv/http/:/home/:/tmp/:/usr/share/pear/:/usr/share/webapps/:/var/www/

Restart both php-fpm and nginx:
systemctl restart php-fpm
systemctl restart nginx

Create a php info script for testing:
nano /var/www/info.php

<?php phpinfo(); ?>

Finally test that php is now being served correctly:
http://192.168.123.123/info.php

Once php is loading correctly its just a simple matter of installing and configuring mariadb for your sql database:
pacman -S mariadb
systemctl start mysqld
mysql_secure_installation

Ensure that the mysql extension is uncommented to allow mysql and php to communicate:
nano /etc/php/php.ini

uncomment extension=mysql.so

You can now download wordpress as follows:
cd /var/www/
wget http://wordpress.org/latest.tar.gz
tar -xvf latest.tar.gz

And from here you should now be able to then follow the famous wordpress 5min install:
http://codex.wordpress.org/Installing_WordPress#Famous_5-Minute_Install

Finally it’s a good idea to set the following services to automatically start at boot time so that your webserver/wordpress site is available immediately after a reboot:
systemctl enable nginx php-fpm mysqld

2013
05.04


First, add your favourite internet time servers to your router, you can get a nice list of publicly available NTP time server here: http://www.timetools.co.uk/ntp-servers/ref/ntp-server-uk.htm

ntp server xxx.xxx.xxx.xxx (prefer)
ntp server yyy.yyy.yyy.yyy

Then add daylight saving time config to the router:
clock timezone gmt 0
clock summer-time BST recurring last Sun Mar 1:00 last Sun Oct 2:00

It may also be worthwhile setting up your Cisco router as a time server with the following command:
ntp master 3

You can then manually add your ‘ntp master’ routers’ ip address to other routers as a time server, it may also be a good idea to lock this down with a related acl.

You can view your routers ntp sync status with the following commands:
show ntp status
show ntp associations

Finally you might also want to add your router as an ntp server so that any dhcp clients in your environment will also receive the correct time with the following dhcp option:
option 42 xxx.xxx.xxx.xxx

2013
05.04

The password is redundant


I recently read an article on ‘the password is redundant and bankrupt’ here:
http://www.smh.com.au/technology/technology-news/could-facial-recognition-technology-destroy-redundant-and-bankrupt-passwords-20120130-1qp7h.html

Whilst this article does a good job of describing the pitfalls of a traditional password from a user experience perspective and the exciting potential of user authentication for the future there’s also the ever growing list of signs that the password is redundant and becoming more and more inherently insecure from a security stand point.

As more and more services are pushed into the cloud and ‘software as a service’ offerings are increasing and becoming more and more rapidly adopted as well as integrated with each other, so are botnets across the internet, not to mention the exponential growth in phishing/whaling/social engineering spam attacks. What was once script kiddies and curious adolescents in their parents basements has now become organised. Companies now exist in parts of the world where employees are recruited and incentivized (with annual leave and bonuses) to run ‘hacking campaigns.’ It’s also almost every second day now that you read about another <INSERT ONLINE SERVICE> that has been hacked and those are only the ones you hear about, on top of this, how many more don’t even realise they’ve been hacked or will publicly admit this?

Ok, I’ll admit maybe I’m being a little bit paranoid, but if you saw half the web/firewall/security logs I’ve seen, the threat is real and certainly isn’t getting any smaller and most people will agree nowadays that the traditional password for authentication is redundant. Most people by now would’ve experienced either first hand or as a recipient someone who has had their <INSERT ONLINE SERVICE ACCOUNTS> being hacked and spam/phishing email being sent out to their entire contacts address book. Whilst this may not have happened to you yet, I can almost certainly guarantee you would’ve received one of these spam emails from someone you know or perhaps even to someone closer such as your immediate family who might even have personal information of yours. (It happened to my mom in South Africa)

Indeed online theft has surpassed and has been a much bigger industry that physical theft for a while now. It allows anyone anywhere in the world to easily and instantly cross borders and exploit vulnerable online accounts 24hours a day, 7 days a week, stealing information and even committing online identity theft. I have been a victim on this myself (our mortgage provider lost all of our personal, sensitive and original financial documents) I can tell you this was not fun.

As such, as you can imagine I’ve been on a bit of a mission recently to enable 2FA authentication, SSL certificates and SSH public key authentication on any public facing services I now use, especially with regards to my own infrastructure, I would hate to fall into this predicament again and I would strongly encourage you to do the same.

2013
05.04

I recently got Fibre broandband courtesy of PlusNET at home and of course me being me wanted to continue using my Cisco firewall instead of the cheap router that came free with the connection.

Below is the PPPoE config I used to bring the connection up on my Cisco firewall passed from the BT openreach B-FOCuS V-2FUb/I Rev.B modem:

interface Ethernet0/3
description Outside
nameif Outside
security-level 0
pppoe client vpdn group PLUSNET-FTTC
ip address pppoe setroute

mtu Outside 1492
vpdn group PLUSNET-FTTC request dialout pppoe
vpdn group PLUSNET-FTTC localname <USERNAME>@plusdsl.net
vpdn group PLUSNET-FTTC ppp authentication chap
vpdn username <USERNAME>@plusdsl.net password *****

And of course the obligatory speedtest.net screenshot

Below are two links I found interesting discussing the differences between the two types of BT openreach modems currently being distributed, the Huawei HG612 being the easier of the two to root. I’ve just picked up a cheap one of these from ebay to play with and compare to my currently installed B-FOCuS V-2FUb/I Rev.B ECI modem.

http://forums.thinkbroadband.com/fibre/4137744-eci-vs-huawei-hg612.html
http://talktalkmembers.net/forums/showthread.php?t=88701

2013
05.04

I’ve recently been experimenting with Amazon AWS services having spun up a few EC2 micro instances and registered for Amazon Route 53 DNS services. The idea is to have my home RaspberryPi serve up my website in the first instance and if for whatever reason my RaspberryPi is not available Amazon Route 53 DNS failover will kick in and show my website from an EC2/S3 instance. Whilst playing around I noticed that my EC2 mirco instance would often fail at the first hurdle with MySQL frequently crashing after ~2days uptime.

After examining my log files I found the following entries:

cat /var/log/mysql/error.log

InnoDB: Initializing buffer pool, size = 128.0M
InnoDB: Completed initialization of buffer pool
InnoDB: highest supported file format is Barracuda.
InnoDB: The log sequence number in ibdata files does not match
InnoDB: the log sequence number in the ib_logfiles!
InnoDB: Starting crash recovery.
InnoDB: Reading tablespace information from the .ibd files...
InnoDB: Restoring possible half-written data pages from the doublewrite
InnoDB: buffer...

Not very telling about what has gone wrong other than mysql seems to be recovering from a crash of some sort.

cat /var/log/dmesg

Contained the following which seems to give a little more insight into the problem:

[1296220.616387] Out of memory: Kill process 12685 (mysqld) score 33 or sacrifice child
[1296220.616416] Killed process 12685 (mysqld) total-vm:1448560kB, anon-rss:256800kB, file-rss:0kB
[1296221.075058] init: mysql main process (12685) killed by KILL signal
[1296221.075159] init: mysql main process ended, respawning
[1296252.243501] apache2 invoked oom-killer: gfp_mask=0x201da, order=0, oom_adj=0,

Indeed after a quick google search it seems to be a relatively common issue for mysql instances to fall over running on Amazon EC2 micro instances, the chief reason for this being that EC2 instances are provisioned without any swap space configured and out of memory errors then occur.

The recommended and also the quickest fix is simply to provision some swap storage space on your server, which can be accomplished with the following commands:

Provision some space for your swap file:
dd if=/dev/zero of=/swapfile bs=1M count=1024

Setup the swap file:
mkswap /swapfile

To enable the swap file immediately but not automatically at boot time:
swapon /swapfile

To enable it at the boot time, add the following entry into /etc/fstab:
/swapfile swap swap defaults 0 0

2013
03.10

SSL certificates are used to verify your identity as well as encrypt traffic between two hosts using public-key cryptography
If SSL utilizes public key cryptography to encrypt the data between two hosts, why is a certificate necessary? The technical answer to that question is that a certificate is not strictly necessary – the data is secure and cannot easily be decrypted by a third party.

So why are certificates necessary? Certificates can be digitally signed by a Certificate Authority (CA). A CA is a trusted third party that has confirmed that the information contained in the certificate is accurate. Without a trusted signed certificate, your data may be encrypted, however, the party you are communicating with may not be who you think they are.

Public encryption keys are therefore distributed via signed and trusted SSL certificates.

Step one, generate yourself a private key for encryption:
To generate a key without a passphrase leave out -des3
openssl genrsa -des3 -out private.key 1024

Alternatively run the command below to convert a key with a passphrase to one without:
openssl rsa -in private.key -out private.key.nopassphrase

When your private key has a passphrase, Apache will have no idea what it is and prompt you for your password whenever the service is (re)started. It is also a good idea to make your private key readable only by root (chmod 400)

Now you can generate a certificate signing request (csr) file from your key file (The certificate signing request (CSR) is an unsigned copy of the SSL certificate) which is submitted to a CA for authenication and signing.
openssl req -new -key private.key -out server.csr

Our CSR has been generated and saved as server.csr. At this point you could send in the request to a CA, pay the fee, prove your identity, and then they would issue you a SSL certificate. All they need is the contents of server.csr which can be retrieved by using the cat command.

Self Signing your csr file
openssl x509 -req -days 3650 -in server.csr -signkey private.key -out server.crt

Alternatively the command below, can be used to create both the private key and self-signed SSL certificate, placing them in the same folder:

openssl req -x509 -nodes -days 365 -newkey rsa:2048 -keyout /root/ssl/apache.key -out /root/ssl/apache.crt

2013
03.10

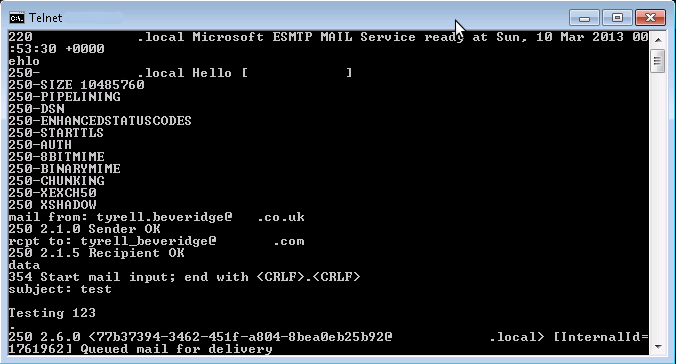
We recently migrated email service providers and as part of the service cutover I needed to check mailflow was working correclty for all hub transport servers in our DAG. In order to do this with minimal disruption and without ‘failing over’ manually to each transport server to verify all was working as expected, I used good ol telnet instead to assist me with the testing as follows:

Ensure the pc you will be connecting from is added as a receive connector on each hub transport server, in order to do so, you’ll need to issue the following powershell command with the following permissions:

New-ReceiveConnector -Name "Test" -Usage Custom -AuthMechanism Tls, ExternalAuthoritative -PermissionGroups AnonymousUsers, ExchangeServers -Bindings 0.0.0.0:25 -RemoteIpRanges 10.10.10.1

Once the receive connector has been created you should then be able to log onto the exchange server with the following telnet command:

telnet TransportServer.domain.local 25

Hopefully you should now receive a ‘service ready’ message after the initial telnet login command. Now that we’re connected to the server we can start issuing commands as follows:

ehlo

This should return some information to let us know we’re connected to an email server with certain capabilities. Finally we can test send an email from the telnet command line as follows:

MAIL FROM: internal@internaldomain.com
RCPT TO: external@externaldomain.com
DATA
SUBJECT:
message content
.
QUIT

Once your message has been successfully sent it should then just be a simple case of checking the message headers once your message has arrived at its destination to confirm the path of the mail flow is as expected.